


 Location
 Login
Login
A size like 25×8-12 breaks down as 25 inches tall, 8 inches wide, built to fit a 12-inch rim. That’s the whole code. The rule that matters more than any number: start with your ATV’s stock size and don’t push diameter more than 1 to 2 inches beyond it without changing suspension or gearing. Before buying anything, check the sidewall, confirm the owner’s manual specs, and verify clearance at full turn and full compression.
TL;DR:
- Increasing tire size beyond 1 to 2 inches over stock usually requires modifications like a lift kit or re-gearing to maintain performance and clearance.
- Always inflate tires to manufacturer-recommended pressures before measuring to ensure accurate dimension comparisons and proper fitment.
- Check full-lock turning and full compression clearance before installing larger tires to prevent rubbing against frame, fenders, or suspension components.
- Opt for proper OEM tire sizes or close equivalents from trusted sources to avoid handling issues, drivetrain strain, or warranty voids.
- Matching front and rear tire diameters as closely as possible helps preserve handling balance, especially when upgrading only one axle.
Table of Contents
- How to Read ATV Tire Sizes
- ATV Tire Size Chart and Common Front/Rear Pairings
- How Does Tire Size Affect Steering and Traction?
- Fitment and Clearance Checklist Before Buying
- Can I Put Bigger Tires on My ATV?
- How to Measure and Verify Tire Size Before Ordering
- Where to Check OEM Specs and Get Fitment Help
- Legal and Warranty Considerations for Tire Size Changes
- A Practical Take on Picking the Right Size
- Find Vehicles and Fitment Support at Importjunkies
- Key External Resources for Verifying Tire Sizes
- Sources
- FAQ
How to Read ATV Tire Sizes
Every ATV tire carries a code on its sidewall, and once you know the pattern, you’ll never have to guess again. The imperial format dominates the ATV world, and it reads as diameter, then width, then rim diameter: 25×8-12. That’s a tire measuring 25 inches tall, 8 inches wide, mounted on a 12-inch rim. You’ll see the middle character written a few different ways: an “x,” a dash, or even an “R” if the tire is radial construction, like 27×9R14. All of them mean the same thing structurally, just with different shorthand.
Metric sizing shows up less often on ATVs but does exist, especially on some utility models and aftermarket fitments. A metric size reads like 205/80R12. To translate that width into inches for a quick mental comparison, divide the millimeter figure by 25.4. 205mm works out to a little over 8 inches, roughly matching an imperial 8 inch wide tire.
That “R” you’ll spot in some codes stands for radial construction, where the internal cords run perpendicular to the direction of travel. Bias-ply tires, which don’t carry that R, have cords running diagonally in overlapping layers. Radials generally flex more comfortably over rocks and roots and run cooler at speed; bias-ply tires tend to be stiffer, more puncture-resistant in certain terrain, and often cheaper.
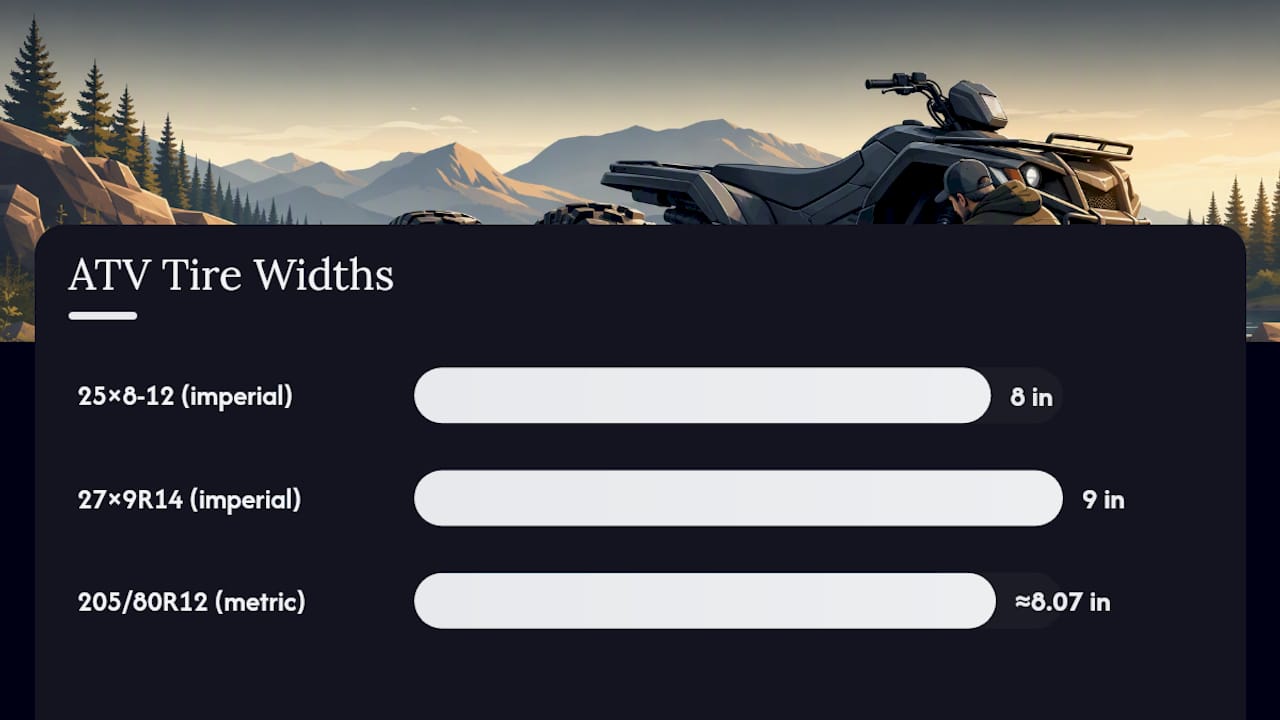
One detail trips up more buyers than any other: a tire’s true dimensions only show up when it’s aired up to the manufacturer’s recommended pressure. A tire measured while soft or overinflated won’t match its printed diameter or width, which throws off clearance math before you’ve even mounted it.
Quick reference for decoding what you’re looking at:
- Diameter (first number): overall tire height when properly inflated, measured tire to tire top to bottom
- Width (second number): the tire’s widest point, tread edge to tread edge
- Rim size (third number): the wheel diameter the tire is designed to seat on, always in inches
- Construction letter (R or none): radial if marked “R,” bias-ply if the letter is absent
ATV Tire Size Chart and Common Front/Rear Pairings
ATV tire diameters generally range from smaller sizes on youth machines up to larger sizes on dedicated mud and rock rigs. Where your ATV falls in that range depends almost entirely on what it was built to do.
| Overall Diameter | Typical Width | Rim Diameter | Common Use |
|---|---|---|---|
| 18"–20" | 6"–7" | 8"–10" | Youth ATVs |
| 20"–25" | 7"–9" | 10"–12" | Sport quads |
| 24"–28" | 8"–10" | 12"–14" | Utility ATVs |
| 27"–32"+ | 9"–12" | 12"–14" | Mud/rock rigs |
Sport quads run smaller, lighter tires because acceleration and cornering matter more than ground clearance. Diameters in the 20 to 25 inch range keep unsprung weight down and steering responsive on tighter trails. Utility ATVs, the workhorses hauling gear or plowing snow, size up to the 24 to 28 inch range for better ground clearance and load capacity without sacrificing too much handling. Mud and rock machines go bigger still, often 27 to 32 inches or beyond, trading efficiency for the flotation and clearance that swampy trails demand.
Front and rear sizes on the same ATV are rarely identical, and that’s by design. A common OEM pairing on utility models runs a 25×8-12 front paired with a 25×10-12 rear, same diameter, wider rear. The rear tire carries more of the vehicle’s weight and does most of the traction work under acceleration, so manufacturers widen it for a larger contact patch. The front stays narrower and lighter to keep steering effort manageable, since you’re turning those tires by hand through the handlebars, not through power steering.
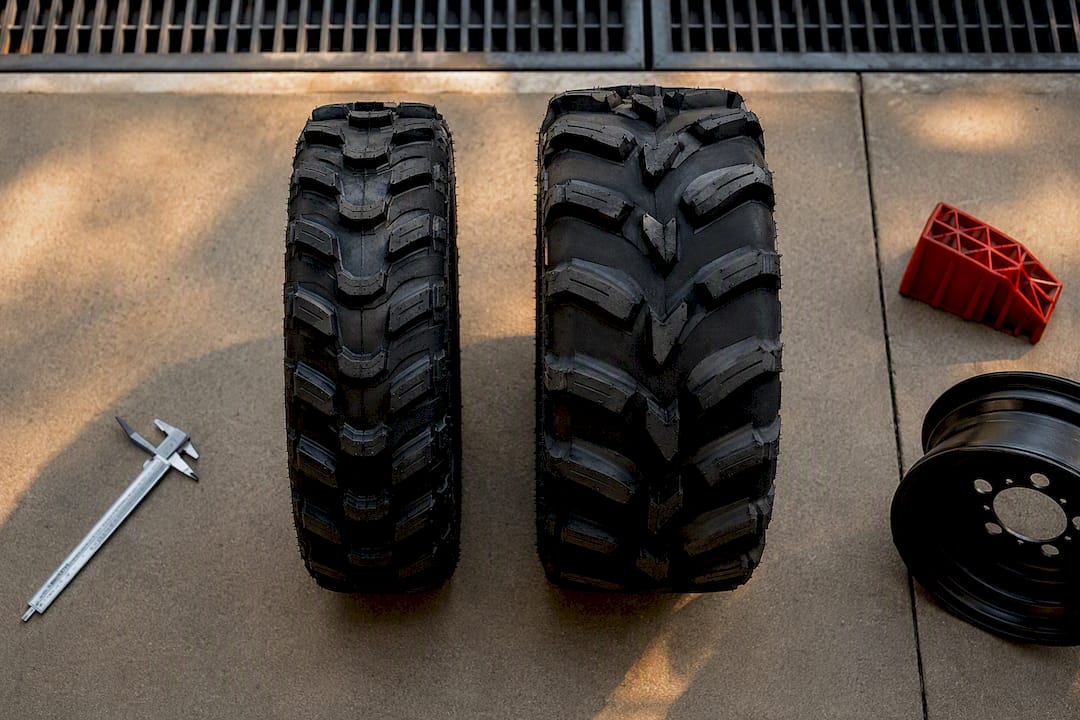
Youth models tend to run matched front and rear sizes since low speeds and light weight make the staggered approach less necessary. Sport and utility machines almost always stagger, and mud-focused builds sometimes go even wider in back for maximum bite when the ground gets soft. If you’re cross-shopping ATV types before you even get to tire specs, it helps to understand the full range of off-road vehicle categories and how their intended terrain shapes everything from suspension to tire width.
How Does Tire Size Affect Steering and Traction?
Front and rear tires do fundamentally different jobs, and that split explains almost every sizing decision manufacturers make.
The front tires steer. They need to turn with minimal resistance, track predictably, and not fight the rider through the handlebars. The rear tires bear load and deliver power to the ground. They’re the ones putting torque down when you hit the throttle, and they take the brunt of the ATV’s weight when you’re loaded up with gear or a passenger.
Widening a front tire adds steering effort, sometimes noticeably, because a wider contact patch resists turning more than a narrow one. Widening a rear tire, by contrast, usually improves traction and stability under acceleration without much downside, which is exactly why manufacturers stagger the two. Diameter changes affect both ends differently too: a taller front tire raises the front end and can make steering feel lighter at speed but heavier at a standstill, while a taller rear tire changes the effective gear ratio the engine has to work against.
- Wider front tire: more steering effort, more stability in ruts
- Wider rear tire: better traction, more stable load carrying
- Taller tire on either end: raises ground clearance but changes effective gearing
- Mismatched diameters front to rear: uneven ride height and altered handling balance
Pro Tip: If you’re only upgrading one axle’s tires because of wear or damage, match the new tire’s diameter as closely as possible to what’s still mounted on the other end. Even a half inch of mismatch front to rear can throw off handling balance more than most riders expect.
Staggered OEM sizing isn’t an accident or a cost-cutting shortcut. It’s a deliberate answer to the fact that steering and traction pull in opposite directions when it comes to tire width.
Fitment and Clearance Checklist Before Buying
A tire that fits on paper can still rub, bind, or grind against your ATV once it’s mounted, turning, and loaded. Running through a physical clearance check before you order, saves you the cost of a return and the frustration of finding out on the trail.
- Check full-lock turning clearance. Turn the wheels all the way to one side, then the other, and look for contact between the tire and any part of the frame, fender, or tie-rod.
- Check full-compression clearance. Push down on the rack or have someone sit on the ATV to compress the suspension fully, then inspect the same contact points again.
- Inspect tie-rods and A-arms. A taller or wider tire can clip these components at extreme steering angles even if it clears everything else at rest.
- Check shock mounts and footwells. Wider tires sometimes brush against lower shock mounts or intrude into footwell space, especially on machines with narrow stock track width.
- Confirm fender lip clearance. This is usually the first place a bigger tire makes contact, particularly during hard cornering or washboard trails.
- Verify rim width matches the tire’s recommended range. Every tire has a manufacturer-recommended rim width window, and mounting outside that range distorts the tire’s profile and handling characteristics.
- Confirm bolt pattern compatibility if you’re also changing wheels, not just tires.
- Decide whether you need a lift kit or offset change. If any step above shows contact, a lift kit, forward-offset A-arms, or wider wheel spacers may be the only way to make a larger tire work safely.
Running through this list takes fifteen minutes and a friend to sit on the rack. Skipping it is how riders end up with a chewed-up fender liner three rides after an upgrade.
Can I Put Bigger Tires on My ATV?
Yes, within limits, and the safe zone is smaller than most riders assume. Going 1 to 2 inches over stock diameter is generally fine on stock suspension and gearing, assuming your clearance check comes back clean. Beyond that, you’re stacking trade-offs that get more noticeable with every added inch.
Bigger tires weigh more and have a larger circumference, which means the engine has to work harder to spin them up to speed. That translates directly into slower acceleration, a duller feel off the throttle, and added strain on the clutch and drive components that weren’t engineered for the extra rotational mass. Riders sometimes describe it as their ATV feeling sluggish after an upsize. That’s the engine fighting a taller effective gear.
- 1 to 2 inches over stock: usually fine without modification, assuming clearance checks pass
- 3 or more inches over stock: expect to need a lift kit, offset A-arms, or re-gearing
- Larger diameter on one axle only: creates handling imbalance and uneven wear patterns
- Significant diameter changes: replace all four tires together to keep the drivetrain and speedometer calibration consistent
Once you’re past the 2 inch mark, plan on real modifications. That typically means a lift kit or forward-offset A-arms for front clearance, plus re-gearing to restore the final drive ratio your engine was tuned around. If you’re eyeing a bigger diameter for mud or rock work specifically, it’s worth reading up on what actually distinguishes trail-ready ATVs from mud-focused builds before committing to the upgrade, since the ideal tire size depends heavily on which category your riding actually falls into.
How to Measure and Verify Tire Size Before Ordering
Start with the two sources that already know the right answer: your owner’s manual and the tire’s own sidewall. Manufacturers publish stock front and rear sizes and bolt patterns in model-specific charts, and those OEM numbers are the safest baseline for any replacement decision.
- Read the sidewall of your current tire and cross-check it against the owner’s manual spec.
- Inflate the tire to the manufacturer’s recommended pressure before measuring, since an under or over inflated tire won’t show its true diameter or width.
- Measure overall diameter tire-top to tire-bottom, and width at the tire’s widest point.
- Confirm rim diameter, the manufacturer’s recommended rim width range, and bolt pattern match your wheels.
- Check the tire’s load rating against your ATV’s weight and typical cargo.
- If you’re comparing a metric size, divide the millimeter width by 25.4 to get an inch equivalent for quick comparison against imperial options.
Statistic to keep in mind: typical ATV tire diameters cluster between roughly 20 and 30 inches depending on the machine’s category, so anything well outside that band is worth double-checking against your specific model before you buy.
Where to Check OEM Specs and Get Fitment Help
The fastest way to avoid a fitment mistake is to look at what your ATV shipped with in the first place. Product listings that show detailed specs let you compare stock dimensions against anything you’re considering as a replacement, and that comparison is worth doing before you swap a single tire.
Importjunkies lists specs directly on its ATV and utility vehicle product pages, which gives you a real reference point for stock sizing rather than guessing from memory. A few habits worth building into your buying process:
- Always compare a listed spec sheet against your owner’s manual before assuming they match.
- Use product pages to sanity-check bolt patterns and rim sizes, not just tire diameter.
- Reach out to customer support with your ATV’s model and year before ordering anything you’re unsure about.
- Ask about return policies for fitment-related issues before you commit, especially on accessory upgrades.
Gary, who oversees buyer guidance here, put it plainly: the manual and the sidewall settle more arguments than any forum thread ever will.
Legal and Warranty Considerations for Tire Size Changes
Changing tire size can quietly void parts of your ATV’s warranty if the upgrade contributes to a failure. Manufacturers generally cover drivetrain components based on the assumption that you’re running factory-spec tires. Oversized tires increase rotational mass and stress on the CVT, clutch, and axles, and if a dealer traces a failure back to a non-stock tire size, warranty claims on that component can be denied. This isn’t universal, but it’s common enough that it’s worth reading your warranty terms before a significant upsize.
Speedometer and odometer accuracy is another quiet casualty. Larger diameter tires cover more ground per rotation, which means your speedometer reads slower than your actual speed, sometimes by a meaningful margin once you’re several inches over stock. That matters if your ATV is ever operated on roads where speed limits apply, and it matters for warranty mileage tracking too.
Street-legal ATVs and UTVs face an added layer: some states regulate tire specifications as part of on-road equipment requirements, tied to load rating, tread depth, or DOT certification depending on where you operate. If your machine is titled for road use, check your state’s equipment rules before swapping to a size that wasn’t part of the original certification. Fitment guides on ATV and UTV safety standards are a useful starting point, though your state’s motor vehicle regulations always take precedence over general guidance.
None of this means you can’t upgrade. It means you should know what you’re trading before you do.
A Practical Take on Picking the Right Size
Stick with stock sizing unless you have a specific, measurable reason to change it, and when you do upgrade, size it to how you actually ride, not how the machine looks on a lift. A trail rider gains little from mud tires; a mud rider loses real capability by staying stock.
— Gary
Find Vehicles and Fitment Support at Importjunkies
If you’re shopping for a new ATV rather than just replacement rubber, Importjunkies gives you a direct look at stock specs before you buy, not after. Every product listing shows the details that matter for fitment, so you’re comparing real numbers instead of marketing copy.

Browse the full lineup of ATVs, UTVs, and off-road vehicles to see stock tire and wheel specs side by side across models, or check a specific option like the 200cc ATV with snow plow package to see how a working utility machine sizes its tires for load and clearance. If you’re still narrowing down what body style and size fit your needs, the UTV sizing guide breaks down how vehicle dimensions and tire specs relate before you commit to a purchase. Have a specific fitment question about a model you’re eyeing? Contact Importjunkies support directly, confirm the spec sheet against what you need, and place your order once you know it fits.
Key External Resources for Verifying Tire Sizes
- SuperATV’s sizing guide covers imperial versus metric formats and construction types.
- BoostATV’s tire size breakdown explains measurement at correct inflation.
- Off Road Lord’s OEM size chart lists bolt patterns and decoder examples.
- Pure Offroad’s sizing guide cross-references stock sizes by model.
Sources
- ATV Tire Size Explained: A Comprehensive Guide
- ATV Tire Sizes: How to Read the Numbers, With Examples
- ATV Tire Size Chart 2025: OEM Sizes + Bolt Pattern
- ATV Tire Sizing Guide - Find the right tire for your ATV.
FAQ
What Is the Most Common ATV Tire Size?
There’s no single universal size, but sport quads commonly run diameters in the 20 to 25 inch range, while utility ATVs typically fall between 24 and 28 inches, with rear tires running wider than the front on most staggered setups.
What Do the Different ATV Tire Sizes Mean?
ATV tire sizes span roughly 18 inches on youth models up to 34 inches or more on dedicated mud and rock machines, with width and rim diameter scaling alongside overall height depending on the vehicle’s intended terrain.
What Does 25×8-12 Mean on an ATV Tire?
It means the tire stands 25 inches tall when properly inflated, measures 8 inches wide at its widest point, and mounts on a 12-inch rim, following the standard diameter times width, dash rim imperial format.
How Do I Know What Tire Size My ATV Needs?
Check the sidewall of your current tires and your owner’s manual first, since those OEM numbers reflect the sizing your manufacturer engineered around, and product listings like those on Importjunkies often list the same specs for cross-checking before purchase.
Can I Increase My ATV’s Tire Size Without Modifications?
You can typically go 1 to 2 inches over stock diameter without changes, but anything beyond that usually requires a lift kit, offset A-arms, or re-gearing to avoid clearance issues and drivetrain strain.


