


 Location
 Login
Login
Most residential electric saunas in the United States require a dedicated 240 V, hard-wired circuit sized at 125% of the heater’s continuous current draw, per the National Electrical Code (NEC). That single rule drives every breaker, wire gauge, and permit decision you will make. Get it right before the walls close, and the rest of the project goes smoothly. Get it wrong, and you are looking at failed inspections, voided warranties, or a genuine fire risk.
Here is what you need to do right now, before you call an electrician:
- Locate the heater’s nameplate (or spec sheet) and write down the kilowatt rating, voltage, and the manufacturer’s recommended breaker and conductor size.
- Apply the 125% rule to confirm the minimum circuit ampacity (more on the math below).
- Hire a licensed electrician who will pull the required permit.
- Schedule a rough-in inspection before your walls are finished.
Two quick exceptions worth knowing: small infrared plug-in sauna units often run on a dedicated 120 V circuit and may not need hardwiring, while very large commercial heaters can require three-phase power or a service upgrade that goes beyond standard residential panel capacity.
Key Takeaways
Most U.S. residential saunas require a dedicated 240 V, hardwired circuit sized at 125% of the heater’s continuous current, with copper conductors, a double-pole breaker, and a permit-backed inspection before walls are finished.
| Point | Details |
|---|---|
| 240 V dedicated circuit | Traditional resistive heaters require a hardwired 240 V circuit; small infrared units may use 120 V. |
| 125% continuous-load rule | Multiply rated amps by 1.25 to get required circuit ampacity, then select the next standard breaker size. |
| THHN/THWN in conduit | NM-B (Romex) is not rated for sauna hot rooms; use 90°C-rated conductors in conduit throughout the hot room. |
| Permit and two inspections | Most jurisdictions require a rough-in inspection before walls close and a final inspection after heater installation. |
| Importjunkies sauna specs | Importjunkies product pages include heater kW ratings and voltage specs to bring directly to your electrician. |
Table of Contents
- What are the sauna electrical requirements for your power supply?
- How do NEC Article 424 and the 125% rule size your circuit?
- What breakers, wire gauges, and wiring methods does a sauna circuit need?
- How are hardwired heaters connected and controlled?
- What wiring materials and routing practices keep a sauna safe?
- When should you run electrical, and what clearances does the heater need?
- Do you need a permit, and when should you hire a licensed electrician?
- Sizing examples you can bring to your electrician
- What should you check before buying a heater or calling an electrician?
- What homeowners consistently get wrong about sauna wiring
- Importjunkies carries sauna specs so you can shop and plan at the same time
- Sources
What are the sauna electrical requirements for your power supply?
Not every sauna heater pulls from the same voltage, and choosing the wrong supply is one of the most common planning mistakes homeowners make.
Traditional resistive heaters (the kind that heat rocks and produce steam) almost always run on 240 V single-phase power. These are the heaters you will find in most residential Finnish-style saunas, and they are hardwired directly to a dedicated circuit. Small infrared units, typically rated at 1.5–2 kW, may operate on a dedicated 120 V outlet, but they generally cannot reach or sustain the high temperatures that traditional heaters achieve.
Three-phase power (400 V in European installations, or 208/480 V in U.S. commercial settings) is rare in American homes. You will only encounter it if you are installing a large commercial-grade heater or if your home already has a three-phase service, which is uncommon outside of rural agricultural properties or light commercial buildings.
Converting kilowatts to amps: the formula you need
The nameplate gives you kilowatts. Your electrician works in amps. The conversion is straightforward:
I (amps) = W (watts) ÷ V (volts)
For a 6 kW heater on a 240 V circuit:
6,000 W ÷ 240 V = 25 A
For three-phase circuits, the formula adjusts to: I = W ÷ (V × 1.732), but again, this is rarely relevant for U.S. residential installations.
How do NEC Article 424 and the 125% rule size your circuit?
NEC Article 424 classifies electric sauna heaters as fixed electric space-heating equipment. That classification matters because it means the heater is treated as a continuous load, defined as a load expected to run for three hours or more. The NEC requires that circuits supplying continuous loads be sized at no less than 125% of the load’s rated current.
Here is the step-by-step math for a 6 kW heater:
- Convert watts to amps: 6,000 ÷ 240 = 25 A
- The National Electrical Code requires sizing the circuit to handle a continuous load at 125% of the rated current.
- The circuit breaker size is selected to the next standard size above the calculated continuous load amperage.
- The conductor wire gauge should correspond to the circuit breaker’s rating to ensure safe operation.
That 40 A breaker and 8 AWG conductor pairing is the most common configuration for a mid-size residential sauna heater. Your electrician will confirm it against the nameplate and local code amendments.
Pro Tip: NEC enforcement and local amendments vary by state and municipality. The NFPA’s NEC enforcement maps show which edition your jurisdiction has adopted. Always confirm with your local building department before finalizing any circuit design.
One more point that homeowners frequently overlook: if the manufacturer’s installation manual specifies a larger breaker or heavier conductor than the NEC minimum, follow the manufacturer. The manual is part of the product’s listing, and deviating from it can void the warranty and create a code violation even when the NEC minimum alone would have passed inspection.
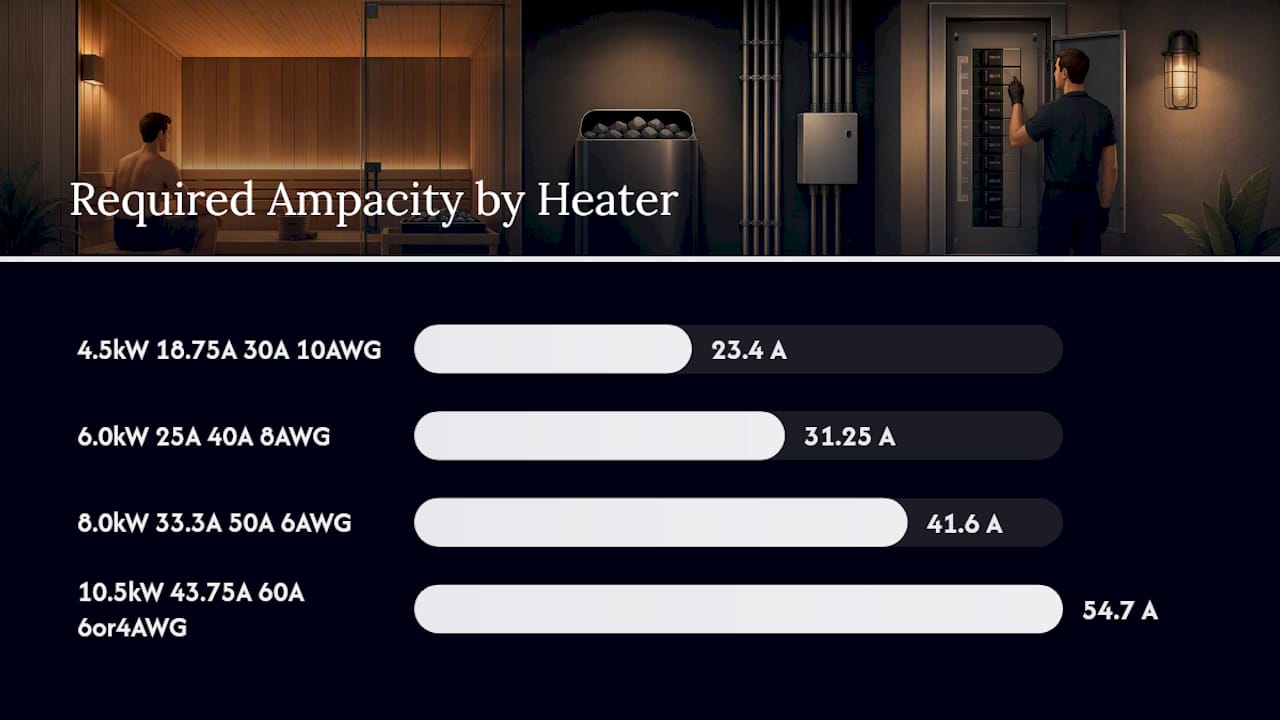
| Heater Size | Rated Amps (240 V) | 125% Ampacity | Minimum Breaker | Minimum AWG (Copper) |
|---|---|---|---|---|
| 4.5 kW | 18.75 A | 23.4 A | 30 A | 10 AWG |
| 6.0 kW | 25 A | 31.25 A | 40 A | 8 AWG |
| 8.0 kW | 33.3 A | 41.6 A | 50 A | 6 AWG |
| 10.5 kW | 43.75 A | 54.7 A | 60 A | 6 AWG or 4 AWG |
What breakers, wire gauges, and wiring methods does a sauna circuit need?
Once you have the required circuit ampacity, translating it into hardware is mostly straightforward, though a few details trip up even experienced DIYers.
Double-pole breakers are non-negotiable for 240 V circuits. A single-pole breaker only interrupts one leg of a 240 V supply, leaving the heater energized on the other leg even when the breaker trips. Every 240 V sauna circuit needs a double-pole breaker that interrupts both legs simultaneously.
Use copper conductors unless the heater manufacturer or your utility explicitly permits listed aluminum alternatives. Aluminum wiring requires anti-oxidant compound at every termination and specific connector ratings, and most residential electricians default to copper for circuits of this size.
Common heater-to-circuit pairings used by experienced sauna installers:
- 4.5 kW heater: 30 A double-pole breaker, 10 AWG copper
- 6.0 kW heater: 40 A double-pole breaker, 8 AWG copper
- 8.0 kW heater: 50 A double-pole breaker, 6 AWG copper
- 10.5 kW heater: 60 A double-pole breaker, 6 AWG or 4 AWG copper (verify with manufacturer)
GFCI protection and voltage drop
GFCI requirements for sauna circuits vary by jurisdiction and by what the heater manufacturer specifies. Some local codes require GFCI protection on sauna heater circuits; others do not. A GFCI breaker trips on leakage currents as small as 5 milliamps, which significantly reduces electrocution risk in a high-humidity environment. The Electrical Safety Foundation International recommends GFCI protection wherever moisture is present. Check your local code and the heater manual before your electrician finalizes the design.
Voltage drop becomes a real concern when the panel is far from the sauna. For runs longer than roughly 50–75 feet, your electrician may recommend stepping up one wire gauge to keep voltage drop within acceptable limits.
Pro Tip: If your panel is in the garage and the sauna is in a detached backyard structure, ask your electrician about a small subpanel near the sauna. It is often more cost-effective than running heavy-gauge wire the full distance, and it gives you capacity for lighting and outlets in the same structure.
How are hardwired heaters connected and controlled?
Most traditional sauna heaters are hardwired, not plug-in, and that distinction shapes where the control box goes and what disconnect hardware you need.
A typical hardwired installation looks like this:
- The control box (timer and temperature controller) mounts outside the hot room, usually on the exterior wall near the sauna door. High ambient temperatures inside the sauna will damage most electronic controllers if they are placed inside.
- A low-voltage sensor lead runs from the control box through the wall into the hot room to monitor interior temperature.
- The heater itself is mounted inside the hot room and wired directly to the control box, which in turn connects to the dedicated circuit.
- A disconnect switch must be located within sight of the heater per NEC requirements and typical manufacturer instructions. For outdoor sauna installations, that disconnect must be rated for weatherproof use.
The heater installation manual is the governing document for all of these decisions. Manufacturers specify exact control mounting locations, minimum clearances from combustible surfaces, and wiring entry points. Following those instructions is not optional if you want to maintain listing compliance and warranty coverage.
What wiring materials and routing practices keep a sauna safe?
The hot room is the most demanding environment in the entire installation, and the wiring choices you make there carry real safety consequences.
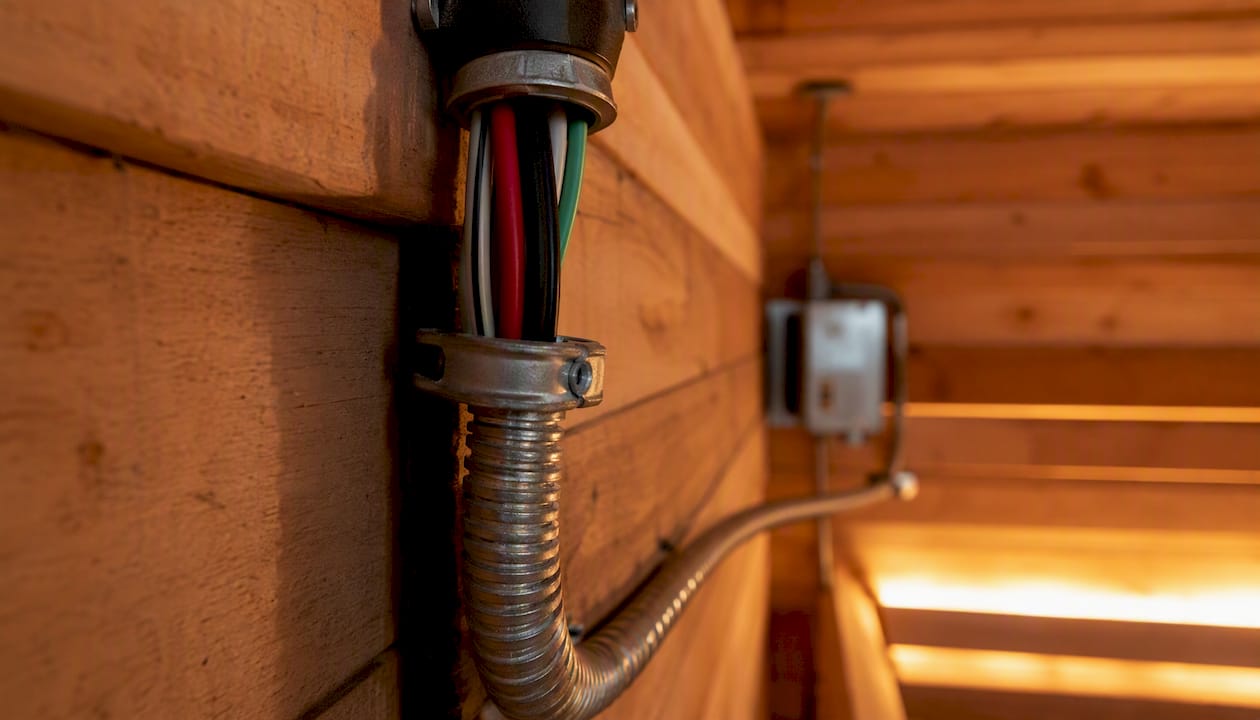
NM-B cable (commonly called Romex) is not appropriate inside the sauna hot room. NM-B’s outer jacket and conductor insulation are not rated for the sustained high temperatures that a sauna hot room reaches during normal operation. Installers consistently recommend THHN/THWN conductors pulled through conduit for any wiring exposed to the hot room’s elevated ambient temperatures.
Key wiring material and routing rules:
- Use 90°C/194°F-rated conductors (THHN/THWN) inside conduit for runs in or through the hot room.
- Observe NEC 110.14© termination temperature limits: even if the conductor is rated for 90°C, the termination point (breaker lug, heater terminal) may only be rated for 60°C or 75°C, which affects how you derate the conductor’s ampacity.
- Route conduit penetrations through the sauna wall so they can be sealed against vapor migration from the hot room to the wall cavity. Unsealed penetrations allow moisture to accumulate inside the wall, which accelerates wood rot and creates a long-term mold risk.
- Keep junction boxes and splices outside the hot room wherever possible. Heat and moisture degrade wire nuts and push-in connectors faster than most homeowners expect.
Pro Tip: Run all conduit and conductors before you install insulation and interior paneling. Retrofitting conduit through a finished sauna wall almost always means tearing out cedar boards, which is expensive and time-consuming.
When should you run electrical, and what clearances does the heater need?
Timing the electrical work correctly saves money and prevents the most common construction-sequence mistake in sauna projects.
Here is the right order:
- Finalize heater location and size before framing begins. The heater’s position determines where conduit enters the hot room, where the control box mounts, and how long the circuit run will be.
- Run conduit and rough-in wiring after framing but before insulation and interior paneling. The rough-in inspection must happen at this stage, while conductors and conduit are visible.
- Schedule the rough-in inspection with your building department. Inspectors verify conductor sizing, conduit type, grounding, and dedicated circuit compliance before the walls close.
- Install insulation and interior paneling after the rough-in passes.
- Mount the heater and connect the control box during finish work.
- Schedule the final inspection after the heater is installed and operational.
Heater clearances are set by the manufacturer, not by a universal NEC rule, so read the manual carefully. Most residential heaters require a minimum distance from combustible surfaces on all sides and a specific mounting height above the floor. Ventilation planning matters here too: a sauna hot room with inadequate fresh-air supply can overheat the space beyond the heater’s design range, stressing both the heater and the wiring.
For fire safety, proper conductor selection and keeping junctions outside the hot room are the two most effective preventive steps. An annual visual check of the heater, wiring connections, and control box adds a reasonable layer of ongoing protection.
Do you need a permit, and when should you hire a licensed electrician?
Short answer: yes to both, in almost every U.S. jurisdiction.
Most local building departments require a permit and at least two inspections for new dedicated circuits above 30 A. Some counties publish specific residential sauna guidance, such as the Klickitat County building department’s combined resource for pools, spas, and saunas, which includes installation checklists and permit requirements. Your county likely has something similar.
Installer-focused guides are consistent on this point: electrical work is the most frequently botched part of a sauna project, and improper wiring is a direct fire and insurance liability. A licensed electrician typically handles permit submittal and inspector coordination, which reduces your risk of a failed inspection and protects you if an insurance claim ever involves the sauna.
When vetting an electrician, confirm the following:
- Valid state license and liability insurance (ask for the license number and verify it with your state licensing board).
- Willingness to pull permits — any electrician who suggests skipping the permit is a red flag.
- Experience with high-amperage residential circuits and, ideally, sauna or spa installations.
- Written quote that includes a load calculation, breaker and conductor specifications, and permit fees.
- References from at least two recent residential jobs.
Sizing examples you can bring to your electrician
These worked examples follow the same formula every time: Watts ÷ Volts = Amps; Amps × 1.25 = required circuit ampacity; select the next standard breaker size and matching conductor.
- 4.5 kW heater: 4,500 ÷ 240 = 18.75 A; × 1.25 = 23.4 A; select 30 A breaker, 10 AWG copper
- 6.0 kW heater: 6,000 ÷ 240 = 25 A; × 1.25 = 31.25 A; select 40 A breaker, 8 AWG copper
- 8.0 kW heater: 8,000 ÷ 240 = 33.3 A; × 1.25 = 41.6 A; select 50 A breaker, 6 AWG copper
- 10.5 kW heater: 10,500 ÷ 240 = 43.75 A; × 1.25 = 54.7 A; select 60 A breaker, 6 AWG or 4 AWG copper
If the manufacturer’s manual specifies a larger breaker or heavier conductor than these calculations produce, follow the manufacturer. The manual supersedes the NEC minimum.
What should you check before buying a heater or calling an electrician?
Arriving prepared cuts the electrician’s site visit time and reduces the chance of a costly change order after work begins.
- Copy the heater nameplate or download the spec sheet. Record the kW rating, voltage, recommended breaker size, and recommended conductor gauge. Attach this to your permit application packet.
- Check your main panel’s available capacity. Count the open breaker slots and note the panel’s total amperage rating (100 A, 150 A, or 200 A service). A 200 A panel with most slots occupied may still have capacity, but a load calculation will confirm it.
- Measure the distance from the panel to the sauna location. Runs over 50–75 feet may require a larger conductor gauge to control voltage drop, or a subpanel near the sauna.
- Decide whether you need a subpanel. If the sauna is in a detached structure or the panel is far away, a subpanel is often the cleaner and more cost-effective solution.
- Confirm outdoor disconnect requirements. Outdoor or detached-structure installations need a weatherproof disconnect rated for the circuit amperage.
- Budget for permit fees. Permit costs vary by jurisdiction but are a required line item, not an optional one.
What homeowners consistently get wrong about sauna wiring
The mistakes that show up most often in sauna electrical projects are not random. They follow a predictable pattern, and most of them are avoidable with a little planning.
The single most common error is running NM-B (Romex) inside the hot room. It is the wire most homeowners and general contractors are comfortable with, so it gets used by default. But Romex is not rated for the sustained temperatures inside a sauna, and an inspector who catches it will require a full rewire before the walls close. Use THHN/THWN in conduit, and route it correctly the first time.
A close second is undersizing the circuit. Homeowners see a 6 kW heater and assume a 25 A breaker is sufficient because 6,000 ÷ 240 = 25. They skip the 125% multiplier, install a 25 A breaker, and end up with a circuit that nuisance-trips or, worse, runs at its thermal limit continuously. The 40 A breaker and 8 AWG conductor exist for exactly this reason.
Skipping the permit is the third mistake, and it carries the longest tail risk. An unpermitted sauna circuit can trigger an insurance denial if a fire occurs, and it becomes a disclosure issue when you sell the home. The permit process is not just bureaucracy. It is the mechanism that puts a licensed inspector between you and a wiring error that might not show up for years.
Get the heater spec sheet to your electrician before the first site visit. Insist on a rough-in inspection before paneling goes up. Those two steps alone eliminate most of the rework that makes sauna electrical projects expensive.
Importjunkies carries sauna specs so you can shop and plan at the same time
Knowing your heater’s electrical specs before you buy is the single best way to avoid surprises during installation. Importjunkies lists saunas with detailed spec sheets, dimensions, and heater compatibility information, so you can pull the exact kW rating and voltage requirements before you ever contact an electrician. The 4–6 Person Outdoor Barrel Sauna is a good example: the product page gives you the heater specs you need to run the 125% calculation and brief your electrician accurately.
Importjunkies also carries a wide range of outdoor and recreational equipment with the same level of spec detail, from electric vehicles to utility gear, all priced direct-to-public. If you have pre-sale questions about a sauna’s electrical compatibility or want to confirm specs before purchase, the Importjunkies product catalog is the place to start. Browse the listings, download the spec sheet, and hand it to your electrician on day one.
Sources
These are the primary code and installer resources referenced throughout this article. Print or bookmark them before meeting with your electrician or visiting the building department.
- Sauna Electrical Requirements: Wiring, Circuits & Code | Tahoe Sauna Company
Recommended
- Home Sauna Buying Guide for Smart Shoppers – Saferwholesale || Import Junkies || Great Sports
- Steam Shower Buyer Guide for Smart Home Upgrades – Saferwholesale || Import Junkies || Great Sports
- 7 Best Home Sauna Options to Compare – Saferwholesale || Import Junkies || Great Sports
- Home Sauna Prices: What You’ll Actually Pay in 2026 – Saferwholesale || Import Junkies || Great Sports


