


 Location
 Login
Login
TL;DR:
- Customization of golf carts enhances performance, aesthetics, and utility based on user needs.
- Proper tools, safety procedures, and step-by-step guidance are essential for safe modifications.
- Testing, legal compliance, and evolving the build over time maximize the cart’s value and functionality.
Every golf cart rolls off the production line looking almost identical to the one next to it. Same color, same seat, same basic setup. If you’ve owned one for any length of time, you’ve probably noticed that the factory configuration doesn’t always match how you actually use it. Maybe you want more ground clearance for rough terrain, a cleaner look for weekend rides, or extra storage for hauling gear. Whatever your goal, customizing your cart gives you control over how it performs, how it looks, and how well it fits your lifestyle. This guide walks you through every stage of that process, from choosing upgrades to testing the finished result.
Table of Contents
- Understanding customization options for golf carts
- What you’ll need: Tools, parts, and safety essentials
- Step-by-step guide: Customizing your golf cart
- Troubleshooting and avoiding common mistakes
- Verifying your results: Testing and legal considerations
- A fresh take on golf cart personalization
- Find your perfect custom golf cart or upgrade kit
- Frequently asked questions
Key Takeaways
| Point | Details |
|---|---|
| Customization is flexible | You can personalize your cart with performance, style, or utility upgrades to suit your needs. |
| Preparation is key | Having the right tools and parts makes the project safer and much easier. |
| Follow a clear process | A step-by-step approach avoids mistakes and ensures great results. |
| Legal checks matter | Test all modifications for safety and confirm street legality before use. |
Understanding customization options for golf carts
Now that you know why you might want a personalized cart, it’s time to explore what you can actually change. Golf cart modifications fall into three main categories: performance, aesthetics, and utility. Each category serves a different purpose, and the best builds usually pull from more than one.
Modern golf carts can be modified to fit individual needs, from off-road capability to enhanced aesthetics. That flexibility is one of the biggest reasons cart ownership has grown well beyond the golf course.
Here’s a quick breakdown of the most popular upgrade types:
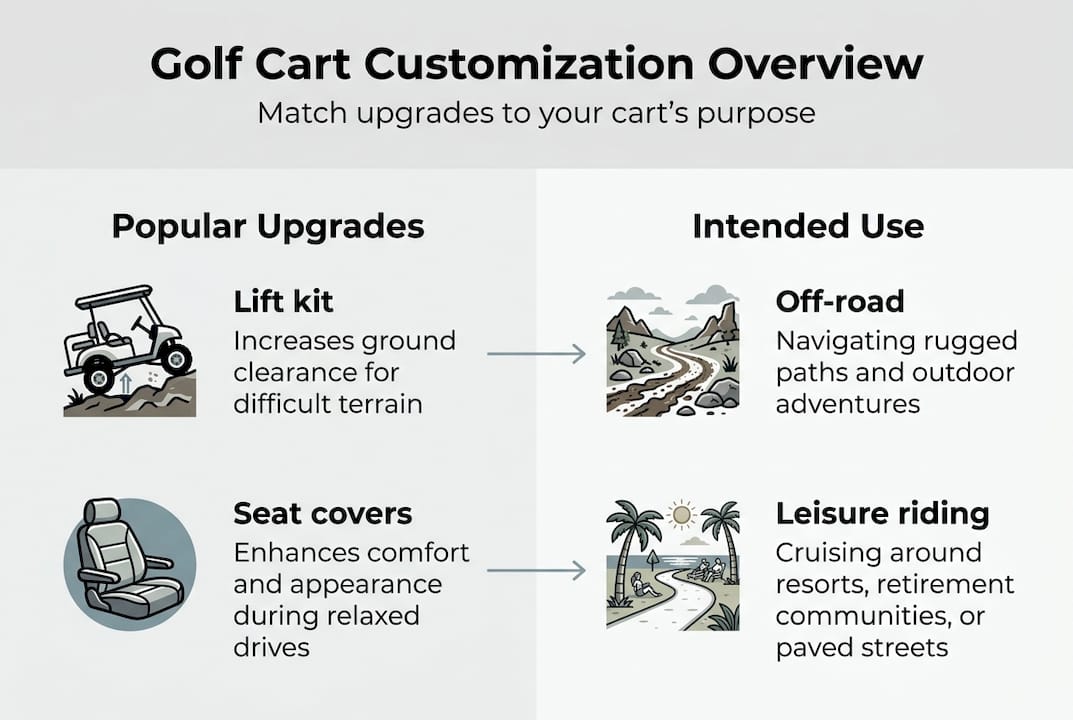
- Lift kits: Raise the cart’s body for better ground clearance on rough terrain
- Custom wheels and tires: Improve grip, handling, and visual appeal
- Paint and body wraps: Change the look without permanent modification
- Custom seating: Add comfort, rear-facing seats, or weatherproof upholstery
- Lighting packages: LED headlights, underbody lights, and turn signals
- Storage and cargo beds: Expand utility for work or recreation
- Windshields and enclosures: Extend usability in cold or rainy weather
| Upgrade type | Primary benefit | Best for |
|---|---|---|
| Lift kit | Ground clearance | Off-road, rough terrain |
| Custom tires | Traction and style | All-terrain, recreation |
| LED lighting | Visibility and aesthetics | Evening use, street legal |
| Rear seating | Passenger capacity | Family, events |
| Cargo bed | Hauling ability | Work, utility |
| Paint/wrap | Visual identity | Style, resale value |
Matching your upgrades to your intended use matters more than most people realize. A cart built for golfing needs are very different from one used for property maintenance or neighborhood errands. Before you spend anything, write down how and where you use your cart most often. That one step prevents a lot of wasted money on mods that don’t serve your actual needs.
What you’ll need: Tools, parts, and safety essentials
With your vision in mind, gathering the right tools and gear is an important next step. Some upgrades require specific tools and safety precautions to avoid injury or damage, so going in unprepared can turn a straightforward project into a frustrating one.
Here’s what a typical customization project requires:
Basic tools:
- Socket set (metric and standard)
- Combination wrenches
- Torque wrench
- Power drill and drill bits
- Floor jack and jack stands
- Flathead and Phillips screwdrivers
- Wire stripper and crimping tool (for electrical work)
Common parts and add-ons:
- Lift kit (spindle or A-arm style depending on your cart model)
- Replacement wheels and all-terrain tires
- LED light kit
- Custom seat covers or replacement seat assembly
- Cargo or utility attachments
Safety gear:
- Safety glasses
- Work gloves
- Steel-toed footwear
Safety first: Always disconnect the battery before starting any mechanical or electrical work. For electric carts, remove the main battery cable. For gas carts, disconnect the negative terminal. Never work under a cart supported only by a floor jack. Use rated jack stands to hold the cart securely before getting underneath it.
| Safety step | Why it matters |
|---|---|
| Disconnect battery | Prevents electrical shorts and shock |
| Use jack stands | Prevents cart from falling during work |
| Wear eye protection | Guards against debris and fluids |
| Torque to spec | Prevents loose parts and instability |
Having everything staged before you start saves time and reduces the chance of stopping mid-project because you’re missing a part.

Step-by-step guide: Customizing your golf cart
Once your equipment is ready, follow these steps for a smooth customization process. Many owners find the process simple with clear instructions and the right kit, especially when tackling one upgrade at a time.
-
Prepare your workspace. Clear a flat, well-lit area large enough to move around the cart. Lay out all tools and parts before you begin. Review your cart’s owner manual for torque specs and any model-specific notes.
-
Disconnect the battery. For electric carts, remove the main positive cable. For gas carts, disconnect the negative battery terminal. This step is non-negotiable.
-
Lift and support the cart. Use a floor jack to raise the cart, then position jack stands under the frame. Never rely on the jack alone while working underneath.
-
Install your lift kit. Follow the lift kit steps included with your specific kit. Spindle lift kits are generally easier for beginners, while A-arm kits offer more suspension travel for serious off-road use. Torque all bolts to the manufacturer’s specification.
-
Mount new wheels and tires. Remove the factory wheels and install your new set. Hand-tighten lug nuts first, then use a torque wrench to finish them in a star pattern for even seating.
-
Install lighting or electrical accessories. Route wiring cleanly along the frame using zip ties. Connect to the appropriate power source and test before buttoning everything up.
-
Customize seating and cosmetics. Swap out seat covers or install a new seat assembly. Apply paint, vinyl wrap, or decals last to avoid scratching during mechanical work.
-
Reconnect the battery and test. Reconnect the battery, lower the cart off the jack stands, and do a slow test drive in a safe area. Check for unusual sounds, vibration, or handling changes.
Pro Tip: When choosing upgrades, tackle mechanical changes before cosmetic ones. It’s much easier to touch up a paint job than to reinstall a lift kit around a freshly wrapped body panel.
Troubleshooting and avoiding common mistakes
Even a well-planned upgrade can hit snags, so here’s how to sidestep issues. Most problems come from a handful of repeated mistakes, and knowing them in advance puts you well ahead of the curve.
Common mistakes to avoid:
- Skipping the battery disconnect before starting work
- Using a floor jack without jack stands for support
- Overtightening bolts, which can crack brackets or strip threads
- Installing a lift kit without adjusting the alignment afterward
- Routing electrical wiring near heat sources or moving parts
- Buying parts without confirming compatibility with your cart’s make and model
Incorrect installation of lift kits is a leading cause of golf cart instability, so alignment checks after any suspension modification are not optional. After installing a lift, take the cart to a flat surface and visually inspect the wheel camber (the angle of the tires relative to the ground). If the tires lean noticeably inward or outward, the alignment needs adjustment.
If a part doesn’t fit as expected, don’t force it. Check the product specs against your cart’s model number. Many lift kits and accessories are model-specific, and a part labeled “universal” may still require minor modifications. Online forums dedicated to your cart brand are a reliable resource for model-specific advice.
For more complex issues, a local golf cart repair shop or powersports dealer can inspect your work and catch problems before they become safety risks. You can also browse a lifted cart example to see how a professionally assembled lifted cart should look and compare it to your own build.
Pro Tip: Take photos at every stage of disassembly. If you forget how something goes back together, those photos save significant time and guesswork.
Verifying your results: Testing and legal considerations
Now, make sure your upgrades are safe and legal before showing off your cart. A completed build isn’t finished until it’s been properly tested and cleared for wherever you plan to use it.
Start with a slow-speed test in a controlled area like a driveway or empty parking lot. Listen for rattling, grinding, or unusual vibration. Check that the steering feels responsive and that the cart tracks straight without pulling to one side. Inspect all bolts visually after the first drive, since some may settle slightly under load.
Certain modifications, like lighting and speed, may affect your cart’s legality on public roads. Street-legal requirements vary by state and municipality, so check your local regulations before driving on public streets.
| Modification | Possible legal impact | What to check |
|---|---|---|
| Speed upgrade | May exceed local cart speed limits | Local ordinance for max speed |
| Lighting additions | May be required or restricted | State street-legal cart laws |
| Lift kit | May change vehicle height classification | Local registration rules |
| Seat additions | May require seat belts | State passenger safety laws |
For street legal concerns, many states require features like headlights, brake lights, turn signals, mirrors, and seat belts for a cart to operate on public roads. Some areas require registration and insurance as well. Contact your local DMV or municipality to confirm what applies in your area before your first public road drive.
A fresh take on golf cart personalization
With the basics covered, here’s a perspective that might change how you plan your next build. Most advice you’ll find focuses on aesthetics or speed upgrades. Bigger tires, louder colors, faster motors. Those are valid choices, but they represent only part of what customization can do for you.
The owners who get the most out of their carts are the ones who think about utility first. Adding a dump bed or a snow plow attachment, for example, transforms a cart from a weekend toy into a year-round tool. That kind of seasonal use thinking delivers real return on investment because the cart earns its keep in multiple seasons instead of sitting idle for months.
Personal touches matter too, but not just for pride of ownership. A well-customized cart with quality upgrades holds its value better than a stock unit. Buyers notice clean builds with purposeful modifications. If you ever decide to sell, those upgrades can return a meaningful portion of what you spent.
The mistake most first-time builders make is treating customization as a one-time event. The best carts evolve over time, with owners adding and refining based on actual use. Start with what solves your biggest current need, then build from there.
Find your perfect custom golf cart or upgrade kit
Ready for your own transformation? Find exactly what you need here.

At Import Junkies, we carry a wide selection of carts that are ready to upgrade right out of the box. Whether you want a head-turning build or a hardworking utility rig, we have options for every budget and use case. Check out the Renegade upgrade option for a lifted electric cart that’s already built for performance. If you need serious utility, the snow plow utility cart handles tough conditions year-round. Browse the full selection to find your starting point, whether that’s a new cart or the parts to take your current one further.
Frequently asked questions
How much does it cost to customize a golf cart?
Basic upgrades like seat covers or LED lights start around a few hundred dollars, but a full build with a lift kit, new tires, and custom paint can easily exceed several thousand dollars depending on parts and labor.
Is it legal to drive a modified golf cart on public roads?
Some states and municipalities allow street-legal carts, but modifications like lighting and speed may require additional equipment like mirrors, seat belts, and turn signals to comply with local laws.
What modifications make the biggest performance improvement?
Lift kits, upgraded tires, and enhanced batteries typically deliver the largest gains, since modern carts can be modified for off-road capability, better handling, and increased range.
Can I customize an electric golf cart as much as a gas one?
Yes, most cosmetic and functional upgrades apply equally to both types, although electric carts have specific considerations around battery voltage, controller compatibility, and range when adding power-hungry accessories.
Recommended
- How to inspect used golf carts: a step-by-step guide – Saferwholesale || Import Junkies || Great Sports
- Lifted golf carts: benefits, types, and how to choose – Saferwholesale || Import Junkies || Great Sports
- 48V Electric Golf Cart 4 Seater Lifted Renegade Edition Utility Golf U – Saferwholesale || Import Junkies || Great Sports
- 48V Electric Golf Cart 4 Seater Renegade Edition Utility Golf UTV – Saferwholesale || Import Junkies || Great Sports
- How to customize golf cart interiors for style and comfort — GOLFCARTSTUFF.COM™


