


 Location
 Login
Login
TL;DR:
- Most utility vehicle failures are preventable through consistent, environment-aware maintenance practices. Proper preparation, regular inspections, and tracking wear signs help avoid costly breakdowns during demanding operations. Upgrading to purpose-built vehicles can further enhance reliability and ease of maintenance in rugged conditions.
Your utility vehicle is hauling equipment to a job site, halfway across a large property, or deep into a trail — and it suddenly shuts down. The belt is gone. The coolant is bone dry. Or the battery just gave up. For small business owners and outdoor recreation operators, that moment of failure does not just cost you time. It can cost you a job, a booking, or the confidence of a customer depending on your operation. The good news is that the vast majority of utility vehicle failures are entirely preventable with a structured, consistent approach to maintenance. This guide walks you through every step.
Table of Contents
- What you need before starting: Tools, supplies, and prep checklist
- Step-by-step utility vehicle maintenance routines
- Belt, drivetrain, and cooling-system care: Prevent common failures
- Handling seasonal changes and off-season storage
- Our unique take: Why most utility vehicle breakdowns are preventable
- Find the right utility vehicle or upgrade your fleet
- Frequently asked questions
Key Takeaways
| Point | Details |
|---|---|
| Follow a maintenance schedule | Adhere to hours-based or seasonal intervals, but adjust for tough conditions and workload. |
| Prioritize fluids and cooling | Regular fluid changes and cooling system checks prevent costly overheating and damage. |
| Inspect belts and brakes | Frequent inspection of drive belts and brake systems can catch wear before failures happen. |
| Tailor seasonal storage routines | Proper off-season care avoids fuel, battery, and tire problems when vehicles are unused. |
| Listen for early warning signs | Catch abnormal sounds, smells, or behaviors early for easier and less expensive fixes. |
What you need before starting: Tools, supplies, and prep checklist
With the stage set, let’s look at exactly what you need on hand before diving into maintenance. Jumping into a service without the right tools wastes time and can leave a job half done.
Before you touch a single bolt, gather the core items that cover most routine maintenance scenarios. Having everything on hand eliminates mid-job trips to the hardware store and keeps the process efficient.
Essential tools and supplies:
- Socket and wrench set (metric and SAE)
- Oil drain pan and funnel
- Torque wrench for hardware retightening
- Fluid-safe containers for coolant and drivetrain fluid
- Wire brush and contact cleaner for electrical checks
- Nitrile gloves and safety glasses (non-negotiable)
- Clean shop rags or microfiber cloths
- Multimeter for battery and electrical testing
- Grease gun with appropriate lube for driveline fittings
Beyond hand tools, you need the right fluids and consumables. These include engine oil matching your manufacturer’s spec, drivetrain and differential fluid, engine coolant, brake fluid (DOT rated for your vehicle), air filter, and a spare drive belt for CVT-equipped machines.
Tracking your service intervals is just as important as having the right parts. An hours-based schedule is the most practical approach for utility UTVs, covering oil and filter service, drive belt inspection and replacement, and drivetrain fluid changes. If your vehicle does not have an hour meter, a simple paper log taped inside the cab works fine. Note the date and odometer or engine hours every time you service the machine.
Your model’s service manual is an essential part of this kit. Manufacturer specs for torque values, fluid capacities, and interval recommendations vary significantly across brands and models. Review the maintenance checklist specific to your vehicle type before each service.
| Supply category | Examples | Why it matters |
|---|---|---|
| Engine service | Oil, filter, drain gasket | Prevents engine wear and failure |
| Drivetrain fluids | Differential, gearbox fluid | Reduces gear and bearing wear |
| Electrical | Spare fuses, bulbs, contact cleaner | Avoids safety hazards and downtime |
| Cooling | Coolant, distilled water | Protects against overheating |
| Drive belt | CVT belt matched to your model | Prevents the #1 trail failure |
| Safety gear | Gloves, eye protection | Protects you during service |
Pro Tip: Build a dedicated maintenance kit in a small toolbox or bucket that lives near your vehicle or in your work trailer. Include a spare drive belt, fuses in the correct amperage for your machine, a spare bulb set, and a tube of dielectric grease. When something fails in the field, you are already half prepared.
Also take time to understand the types of utility vehicles you operate. A liquid-cooled side-by-side has very different maintenance needs than an air-cooled utility cart, and skipping that distinction leads to missed steps.
Step-by-step utility vehicle maintenance routines
With your tools assembled, follow this workflow for the most common and crucial utility vehicle maintenance routines. These steps apply to most gas-powered side-by-sides, utility trucks, and multi-passenger work vehicles.
Safety first: Always park on a flat surface, engage the parking brake, chock the wheels, and disconnect the negative battery terminal before working on electrical components or under the hood. Ignoring this step is how accidents happen.
Step 1: Check and change engine oil. Warm the engine for a few minutes before draining the oil — warm oil flows out more completely and carries more suspended debris with it. Drain fully, replace the filter, reinstall the drain plug to manufacturer torque spec, and fill with the correct grade. Check the level on the dipstick before starting.
Step 2: Inspect drivetrain and differential fluids. These fluids are often overlooked but bear enormous load during work cycles. Pull the fill plug and check color and consistency. Fluid that looks milky has water contamination. Dark brown or gritty fluid is past due. Drain and replace if in doubt.
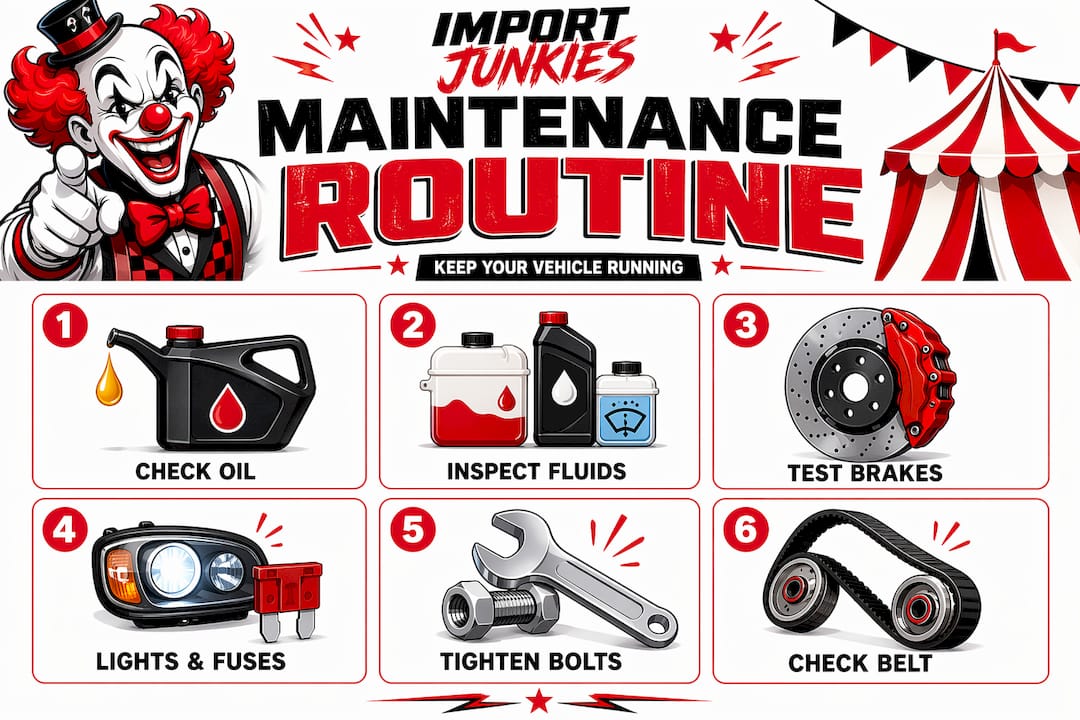
Step 3: Brake system inspection. Preventive maintenance on a utility workhorse should always prioritize brake function. Check the fluid reservoir level and color. Dark, murky brake fluid absorbs moisture over time and raises the boiling point, reducing stopping power. Inspect pads or shoes for wear and replace them if the friction material is under 3mm.
Step 4: Check lights, fuses, and wiring. Walk around the vehicle with the key on. Test headlights, taillights, brake lights, and any work lights. Pull and inspect fuses if any circuit is dead. Check exposed wiring for fraying or corrosion, particularly near the battery terminals and under the vehicle where road debris can chafe insulation.
Step 5: Tighten hardware and lubricate pivot points. Vibration loosens bolts over time, especially on vehicles used on rough terrain. Check wheel lug nuts, suspension pivot bolts, and steering components for tightness. Apply grease to all zerk fittings on the driveline and suspension, including CV joint boots if equipped.
Step 6: Inspect the drive belt. This deserves its own section and gets one below, but during your routine check, remove the belt cover and look for glazing (shiny, hardened surface), fraying edges, cracks, or a burnt smell. Refer to the smart buyer inspection checklist for what to look for on each component.
| Maintenance task | Frequency | Key warning sign |
|---|---|---|
| Engine oil change | Every 100 hours | Dark/thick oil, low level |
| Brake fluid check | Every 50 hours | Discolored, low reservoir |
| Drive belt inspection | Every 25 hours | Glazing, fraying, slipping |
| Lube driveline fittings | Every 25 hours | Squeaking, binding |
| Lights and fuses | Monthly | Dim lights, blown fuses |
| Drivetrain fluid | Every 100 hours | Milky or dark fluid |
Belt, drivetrain, and cooling-system care: Prevent common failures
After standard routine checks, put special focus on the components most likely to sideline your vehicle: belts, drivetrain, and cooling system. These three areas account for the overwhelming majority of unplanned utility vehicle breakdowns.
Drive belt and CVT care. The continuously variable transmission belt is the single most commonly replaced part on gas-powered utility vehicles. Belt wear accelerates with heat, water and mud intrusion, heavy loads, and aggressive throttle application. The design of a CVT means that each of these stressors creates friction and heat that slowly degrades the rubber compound, even when the belt looks intact on the outside.
Watch for these specific warning signs:
- Glazing: A shiny or hardened appearance on the belt surface indicates heat-related hardening. The belt will slip, especially under load.
- Fraying or cracking: Visible damage to belt edges or ribs signals the belt is near the end of its life.
- Burnt smell: A sharp, rubber-burning odor after operation means the belt is slipping internally.
- Hesitation or surging: If the vehicle hesitates at low speed or surges unexpectedly, the CVT belt is often the first place to check.
- Belt dust in the clutch housing: Accumulation of fine black powder inside the belt cover is a sign of accelerated wear.
Pro Tip: Do not wait for a belt to snap before replacing it. At the first sign of glazing or abnormal belt dust buildup, swap the belt. A replacement belt costs far less than a tow from the trail or a missed day of work.
Cooling system care. Cooling-system neglect is a major risk factor for long-term engine health in utility UTVs, especially those used in hot weather or under sustained heavy loads. The cooling system in most liquid-cooled machines includes a radiator, coolant reservoir, water pump, thermostat, and one or more fans. Any failure in this chain can result in engine overheating within minutes.
Check the radiator fins for mud, debris, and grass clippings regularly. A partially blocked radiator loses a significant portion of its cooling capacity. Use low-pressure compressed air or a soft brush to clear debris from the outside of the fins without bending them. Inspect the coolant condition every 50 hours. Fresh coolant is typically clear green, orange, or blue depending on the type. Coolant that appears rusty or brown is degraded and should be flushed and replaced. Test the thermostat and fan operation by allowing the engine to reach operating temperature and confirming the fan kicks on and the temperature stabilizes.
For vehicles used in property or land maintenance work under high ambient temperatures, check coolant levels before every use. Even a small leak that drips slowly can leave you without coolant on a long operating day. Keep a small jug of pre-mixed coolant in your work kit.
For CVT maintenance records and resources, the news section at Import Junkies covers additional model-specific guidance as new vehicles and updates are added.
Handling seasonal changes and off-season storage
Beyond regular operations, adapting your care for each season and proper storage is key to reducing costly downtime. Whether your vehicle sits for two months or six, storage prep is not optional.
A critical reminder: Skipping storage preparation is one of the most expensive mistakes a utility vehicle owner can make. Degraded fuel varnishes carburetors and fuel injectors. A discharged battery that freezes in cold storage often cannot be recovered. These repairs cost far more than 30 minutes of prep before you park the vehicle for the season.
Pre-storage routine (step by step):
- Run the vehicle to full operating temperature, then change the engine oil and filter while the oil is warm. Old oil contains acids from combustion that will corrode internal components during storage.
- Top off the fuel tank and add a fuel stabilizer rated for your storage duration. Run the engine for 10 minutes after adding stabilizer so it circulates through the fuel system.
- Inspect and clean the air filter. Replace it if it is clogged or damaged.
- Check and adjust tire pressure to the manufacturer’s spec. If storing for more than 90 days, elevate the vehicle on jack stands to prevent flat spots from developing.
- Connect the battery to a quality trickle or maintenance charger. A fully charged battery resists freezing and sulfation, both of which can permanently reduce capacity.
- Apply a light coat of corrosion inhibitor to exposed metal surfaces, particularly under the frame and around the exhaust.
What to check when returning to service:
- Engine oil level and condition
- Battery voltage (should read 12.6V or higher at rest for a 12V system)
- Brake function, including both parking and service brakes
- Tire pressure and visual inspection for cracking or flat spots
- Drive belt condition before the first hard run
- Air and fuel filters for any moisture or pest intrusion
- All lights and electrical systems
A proper pre-season inspection catches the problems storage can cause before you are out in the field depending on the vehicle. Taking 45 minutes to go through the return-to-service checklist every spring is one of the best investments of time you can make. According to seasonal UTV maintenance guidance, a proper pre-season routine covers filters, brakes, battery, and drive belt as core priorities before the first use of the year.
Our unique take: Why most utility vehicle breakdowns are preventable
Most guides hand you a checklist and call it done. The checklist matters, but it only tells you what to inspect, not how to think about your machine. Here is what separates operators who rarely break down from those who constantly deal with unplanned repairs.
The vast majority of belt failures, cooling failures, and brake failures give you clear warning signs well before they become emergencies. A belt that is starting to glaze slips slightly under load before it ever snaps. A cooling system on its way out shows small temperature spikes or takes longer to stabilize. Brakes that are wearing unevenly pull subtly to one side before they fail. These signs are easy to miss if you only look at the vehicle during scheduled service.
What really drives maintenance effectiveness is environment and workload awareness. Tightening your intervals based on conditions — heat, dust, water crossings, heavy towing, and idle time — matters more than simply following the factory schedule. A vehicle hauling heavy loads through summer heat on dusty terrain may need belt and fluid checks twice as often as the same model used lightly on groomed paths. The odometer or hour meter does not capture that reality.
Our recommendation: build a simple personal log for your vehicle. After every use, note anything unusual — a new noise, a hesitation, a temperature spike, a vibration. These observations, tracked over time, give you a real picture of how your machine is aging and where wear is accumulating. It takes 60 seconds per use and has prevented more failures for experienced operators than any factory checklist. A good utility vehicle value comparison also helps you understand when upgrading to a more suitable vehicle is the smarter financial choice versus continuing to maintain one that is past its practical service life.
Find the right utility vehicle or upgrade your fleet
Ready to make maintenance easier with the right equipment or enhance your fleet? Good maintenance habits go further when they are applied to a vehicle that is built for the demands you put on it.
At Import Junkies, we carry a range of work-ready utility vehicles built for both heavy-duty performance and straightforward serviceability. If you are looking for a capable, efficient option, our 48V electric utility golf UTV is a strong choice for property management, golf course operations, and light work use. For operators who need four-wheel-drive capability with heavy-load capacity, the MSA 300cc 4x4 ATV with snow plow is a proven performer across seasons. Browse our full inventory to find a vehicle matched to your workload.
Frequently asked questions
How often should I change fluids in my utility vehicle?
Check fluid levels around 50 hours and change engine oil and drivetrain fluids around every 100 hours, but shorten that interval significantly if you operate in dusty, wet, or high-heat conditions. Always verify the specific schedule in your owner’s manual.
Why does my drive belt wear out quickly?
Belt wear accelerates with heat buildup, water and mud contamination, heavy towing, and aggressive throttle use, so routine inspection and keeping the CVT housing clean are the most effective preventive steps.
How should I prepare my utility vehicle for storage?
Change the oil, stabilize the fuel, maintain battery charge with a trickle charger, and store tires at spec pressure on blocks if storing for more than 90 days to prevent flat spots and rubber degradation.
What are the early warning signs of cooling system problems?
Overheating signs include rising temperature gauge readings, steam from the overflow reservoir, or a radiator that feels cool to the touch while the engine is running hot, which can indicate a stuck thermostat or failed water pump.
Do maintenance intervals change if I drive in harsh environments?
Yes. Dust, heat, repeated water crossings, and heavy loads all accelerate wear significantly. Intervals should be shortened from the base factory schedule whenever operating conditions are consistently demanding, not just when something looks wrong.
Recommended
- Optimize Golf Course Vehicles: Essential Maintenance Checklist – Saferwholesale || Import Junkies || Great Sports
- The ultimate utility vehicles checklist for smart buyers – Saferwholesale || Import Junkies || Great Sports
- Utility trucks vs. golf carts: which delivers more value? – Saferwholesale || Import Junkies || Great Sports
- Utility Vehicles Explained: Uses, Types, and Right Fit – Saferwholesale || Import Junkies || Great Sports


